Thursday, September 11, 2003
Linux (Mandrake 9.1/Ubuntu Breezy 5.10) on a Fujitsu P1120
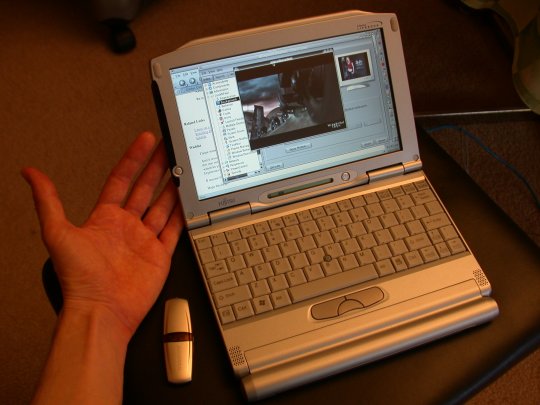
My Fujitsu P1120 running Mandrake 9.1; and a tiny 64MB USB flash drive.
Here is a summary of how I got Mandrake 9.1 linux working
reasonably well on a Fujitsu P1120 (P1000 series) [Update, Nov
29, 2005: See near the bottom for some notes on upgrading to
Ubuntu Breezy 5.10]:
- Feedback:
-
If you find this page useful or have additions or comments or would like to see other people's additions or comments, please go, or let me know, here.
- Disclaimer:
-
Even though I say "you" in here a lot, these are notes to myself. Use at your own risk. In particular, I'm not sure if Linux performs some potentially necessary speed throttling in order to regulate the temperature of this fan-less laptop, so if yours melts in your lap, don't blame me.
- Summary:
-
Mandrake 9.1 pretty much installed without issue and resulted in a working Linux machine. It took a slight tweak to get audio working, and I failed to get either the touch screen or suspend (sleeping the laptop) working. [Update, Oct 13, 2003: the touch screen is now working; see the update at the end of this page.] [Update, Jan 8, 2004: Someone else got suspend mostly working; see the Related Links section.] I have not yet tested the wireless, but it looks like it will work. [Update, Oct 13: wireless works. I had to use a non-default driver to get kismet working; details on request.] Ethernet worked fine without issue. I did a bit of a hack to get the keyboard remapped to a more usable configuration, but the result is fairly easy to customize and works great.
I wasted the most time trying (and failing) to get the touch screen working, and getting the keyboard mapping not only just-so, but so it would auto-configure when I logged in. The rest was pretty painless.
The laptop itself is quite usable. I certainly don't find myself wishing it were any bigger, or needing it to be any faster. It's been my main machine for a week now and it feels pretty much like my desktop setup did.
I've tried to organize this document with the relevant actions and factoids indented and with bold headers so its easy to ignore the rest. If there's anything I could change or add to this document to make it more useful please let me know. - Where I got mine:
-
I bought mine from Laptopsinc, who offered the unit at the same price as Fujitsu, but offered free shipping, no sales tax outside of California, and threw in a free 64MB USB flash drive in the deal (which will make a great pendant-sized backup for journal entries and such while on the road). Also, they were very straightforward and helpful when I called them with a couple of questions, so they get my all around recommendation.
Specs:
- Weight: 2.5 pounds (with high-cap battery)
- 800Mhz Transmeta Crusoe (TM5800)
- 256MB SDRAM
- 30GB Hard Drive
- High capacity battery (~8 hours)
- 8.9" WideXGA TFT Display (1024x600)
- 10/100mbps LAN
- 802.11b WiFi (Wireless LAN)
- Clittermouse
- TouchScreen [now working, as of Oct 13]
- Silver Magnesium Encasing
- 1 Year International Warranty
Not yet working under Linux:
- 56K V.90 Global Modem
Parasitic drag:
- Windows XP Home
- Useful things to know before you start:
-
Really you can just skim (or skip) this section unless you run into problems.
-
Holding down the power key for some number of seconds will force the machine to power off (dirty--last resort). You don't need to unplug the battery.
-
Once X windows is running, ctrl-alt-backspace will kill the X server and drop you back into the login manager or the console (whichever you started in). Again, this is a last resort.
-
Better is: ctrl-alt-F1..F7 will switch you between virtual screens. F1..F6 are text consoles, and F7 is the graphics screen used by X and by the graphic login manager. I have had no trouble flipping back and forth between these on this laptop, and it's very handy when you're trying to fine-tune (or debug) issues with X11.
I use this sometimes just to bring up a quick terminal when all my virtual X desktops are busy and cluttered with other stuff. Try it. Use it. Love it.
-
"telinit 3" (as root) from a console window will bring the system down to a text-console only mode (still multi-user, just no graphical login manager). From here, you can run "startx" to enter your last used environment (e.g,. KDE) bypassing the login manager. "telinit 5" brings the graphical login manager back online. This is a perfectly legit way to bring the display manager down and back up around tweaking the X config files. However, if the display manager crashes (you'll see a red Failed when trying to shut it down during "telinit 3") you'll probably have to reboot unless you feel like resetting the init state by hand.
-
Useful commands or topics to know about ("man" them): lilo, telinit, xdm, showkey, loadkeys, xev, xmodmap, acpi, XF86Config.
-
- Installing without an optical drive:
-
The P1120 doesn't have a CD drive, which is fine for my purposes but does make installing a new OS a little more challenging.
Fortunately, it boots fine from the included external USB floppy drive. (If this hadn't worked, I would have tried booting from the USB flash memory [Update, April 21, 2004: See the Update note near the bottom, this date, re. booting via USB pen], and if that had failed I would have tried net booting over tftp and all that [ick]. [Update, March 19, 2004: See the Update note near the bottom, this date, re. installing via net booting.])
Action: Create a boot floppy from the network install image (network.img, I think) per the standard instructions in the Mandrake quick start docs. Boot it. [I think the BIOS is set by default to try booting from the floppy if possible, so you don't need to anything special besides popping the floppy in the drive and turning on the machine. If that doesn't work, then you may need to futz with the BIOS menus to change the boot order to try the floppy.]
Warning: The first time I tried this, I got a kernel panic part way through the boot process. This was, needless to say, very discouraging. There was a "crc error" mentioned a few lines before the panic, and while this could have meant many things I luckily tried the simplest possibility first: It turned out the floppy hadn't taken the image and neither the floppy writing program nor the boot loader had bothered to notice or report this (in any obvious way). I have had this problem in the past with boot floppies -- it often takes many tries to find a floppy that will take the entire image without error. My guess is that in normal use the bad blocks are marked and skipped when a floppy is formatted, but when writing a raw disk image to the floppy like this any bad blocks simply cause a failure. Conclusion: double-check the floppy by reading the image back off the floppy and comparing against the original image before you try to boot off it.
At this point you need to point it at a network source for the install files. You can go out to the net if you have a fast connection, but in my case I was on dialup at the time so I set up a friend's machine to serve as the network install source on the local LAN:
Optional: Copy the Mandrake install CD1 to the computer that will serve the install. Then merge in the contents of the Mandrake folders on CD2 and CD3 into the Mandrake folder from CD1, so when you are done, the Mandrake folder under the original CD1 copy contains RPMS, RPMS2 and RPMS3.
Action: Back at the install prompts, config the network as appropriate for your LAN, then point it at the directory (via ftp or http) on the install server that contains the Mandrake folder which in turn contains the RPM directories (i.e., don't point it directly at the Mandrake folder itself).
Then let'er rip.
- Keyboard and Mouse
-
The default keyboard selection seems to work fine, but the mouse chooses the touch screen by default, which sort of works but not really (it is emulating a USB PS2 mouse in a pseudo-relative mode which isn't really functional but sort of lets you poke around if you're lucky).
Action: Using the touch-screen with some finesse, or the keyboard if possible, select the Glide Point mouse under the PS/2 subsection.
Now the clittermouse should work fine, along with all three buttons. Yay.
- Partitioning
-
When it comes to partitioning, you'll probably want to do a custom job. I just chucked Windoze entirely, so repartitioned the whole disk from scratch, but I made the mistake of letting Mandrake do the partitioning for me. (It did a fine job, just not what I needed or wanted for this machine.) I later had to back up the preliminary contents of the /home partition onto the flash drive so I could repartition. In particular, I wanted to use ReiserFS, but also it turns out you need a special partition in order to use the BIOS's suspend-to-disk feature. [Alas, the latter doesn't quite work under linux yet (it tries, though), but it probably will under kernel 2.6 so you'll want the partition ready for it.]
Action: Partition the drive as you see fit, but include a small primary partition of type "a0" ("IBM Thinkpad hibernation"). [Note it must be a primary partition, not an extended partition. This is a "preference" when you create the partition.] The size should be at least 266MB for my exact model, but more generally:
I don't know whether you can use Reiser for the boot partition, but I believe you can with the Mandrake distributed kernel (I think Reiser needs to be compiled into the kernel rather than as a module). I'll find out next upgrade; I would have done it this time but as I say I spaced on it until I was pretty far along. There may still be some issues with devfs and Reiser not getting along, but I believe the "notails" option to Reiser used to solve even this.From http://greenfly.org/fujitsu/: "The partition size should be equal to physical RAM + video memory + 2MB"
"lphdisk --probeonly" (explained later) says:
"Recommended partition size is 266 MB (544770 sectors)"
I made mine about 300MB 'cause I'm just that way.
Consideration: I haven't looked too closely into the details of the 2.6 kernel, but it's possible the above suspend partition will never actually be useful--the 2.6 kernel may well just suspend itself to its own swap partitions, bypassing the BIOS, and eliminating the need for a separate chunk of disk to be lost to the suspend partition. (On the other hand, it's still possible suspending to this partition can be made to work under the 2.4 kernel -- others have done it with slightly older versions of this machine under APM rather than ACPI so maybe I'm just missing something.) If anyone knows more about any of this, please tell me.
Recommendation: I find ReiserFS "feels" way better than EXT3 and have been using it for my /home partitions for a couple years now. On my previous machine I had two disks with identical contents (one was a mirror of the other), one with Reiser (the active one) and one with EXT3 (the backup), and the few times I went poking around my backups I was reminded how much smoother Reiser is (yes, even taking caching into account due to one being more actively used than the other). Also, EXT3 hits the disk constantly, which is bad for a laptop. I don't know if Reiser is any better this way, but it can't be worse. Reiser is especially good with large numbers of small files--besides being much faster in that case, it even uses up notably less disk space (far fewer half-empty blocks).
Select packages as you see fit and proceed with the install.
- Graphics Config
-
The graphics config sort of worked by default, though not great. The resolution it chose was not right, but the computer was smart enough to scale it to fit anyway (resulting in non-square pixels). Live with it until the install is done, then come back and fix the XF86Config-4 file later:
Action: Fix the /etc/X11/XF86Config-4 file. The easiest thing is probably just to drop in mine (follow the link), or you can pick and choose from it. [Note, that linked version does NOT include the Oct 13 update to get the touch screen working properly since a few other things need to be done for that; see the Touchscren section below for details.] Some notes:
-
The "modeline" is the most important change.
Modeline "1024x600" 51 1024 1040 1216 1328 600 600 606 626
(ModeLine "xxxxxx" pixelclock screen_width hsync_start hsync_end h_total screen_height vsync_start vsync_end v_total [optional parameters])
I picked it up from here, and it works pretty well, but I do see some slight color aliasing on black-on-white text which makes me think it may be off by a tiny bit. If anyone finds a better modeline for this screen, please let me know.
-
It is set up for 15, 16, and 24 bit-depths. I have it defaulting to 16 bits because it seems slightly more responsive (especially when flipping through virtual desktops) than the 24 bit mode and not notably worse looking. To change it, you need to change the default in the config file and log out and back in. (X11 doesn't let you change screen depths on the fly that I am aware of.)
-
I have entries for both the clittermouse and the touch screen and they are set to work together (and sort of do), except I have disabled the touch screen in the very last section (ServerLayout) because the touch screen doesn't really work. Somebody needs to figure out what protocol it really uses (the PS/2 is clearly a lame fallback default, as is standard for many mouse devices, but isn't sufficient for a device that really needs to be run in absolute rather than relative mode). Hopefully this will work soon--it works with a finger as well as a pen, so one could literally surf the web by tapping on links with your finger.
-
- Audio
-
At this point, it should be a fairly usable machine. The only obvious thing missing (besides suspend) is audio--when you boot you'll probably find the trident sound driver isn't loading for some reason. This turns out to be trivial to fix: There is a better driver under ALSA. You want the snd-ali5451 driver, plus the OSS drivers which let you run OSS applications on top of an ALSA driver. By hand, you can do this (as root; but don't bother, as it won't persist past a reboot anyway and there's an easier way that will):
modprobe snd-ali5451
modprobe snd-pcm-oss
modprobe snd-mixer-oss
modprobe snd-seq-oss
More simply:
Action: Using HardDrake, select the "alternate" driver for the sound card, which should be the snd-ali5451 ALSA driver. This will also set things up so it loads this driver by default at boot time:
Main Menu /
        Configuration /
                Mandrake Control Center /
                        Hardware /
                                HardDrake /
                                        Sound Card /
                                                M5451 PCI South Bridge Audio /
                                                        Run Config Tool /
                                                                Driver: snd-ali5451
Warning! Note you'll need to open up an audio mixer app to turn up the (main) Volume and PCM Volume before you'll hear anything! By default, these are set to 0, so your audio could be working fine and you won't hear anything if you run a basic app like mpg123 to test it. (Some of the smarter apps may adjust these volumes automatically but don't count on it. Technically this is the strict domain of mixers.) I used "aumix" which is under the menus someplace fairly obvious.
- More stuff that "just works":
-
I stuck the JetFlash memory stick into the USB port in the back of the computer, and typed (as a normal user -- no need to be root here) "mount /mnt/memory_card", and presto, I had a ~64MB file system mounted which I could copy files back and forth to just like another disk or floppy. I'm not sure how or when the memory_card directory was created, but it was there the first time I looked (which was after I plugged the JetFlash in). I'm not sure why it doesn't mount automatically (shouldn't supermount handle this?) and I don't know what happens if I pull it out before umounting it ("umount /mnt/memory_card").
The volume, mute, and screen brightness buttons on the keyboard work fine. The mouse button, Fn-F4, disables (and re-enables) the mouse. I'm not sure why this is useful. I think the button can be disabled in the BIOS.
The little LCD status panel works fine--it shows battery and charging status, disk access, and the state of capslock, numlock, and such.
The Fn-F5 key, the funny checker pattern, controls whether the display is auto-scaled to fit in the event that the base resolution isn't right. It works, and is most notable in console mode, but I think it got confused last time I was playing with it and caused me some grief so I don't recommend twiddling it just for fun. Fn-F10 is supposed to control whether display output goes to an external monitor, the LCD, or both. I haven't tested this, and have no idea what it would do given the natural resolution of the LCD is an odd aspect ratio (1024x600).
- Custom Kernel: (optional!)
-
I decided to compile my own kernel (first time) to see if it would run any faster optimized for my Crusoe processor than for a generic x86. I was futzing with too many things at once to really say whether it helped, but it's certainly no worse. It feels plenty zippy now, so if yours seems doggy, try a custom kernel. I downloaded the latest version of the kernel sources using the Mandrake software updater (...0.25mdk) and used "make xconfig" to set the processor type to Crusoe. That's all I changed, and otherwise I just followed the (rather simple) instructions in the Mandrake docs. After the "make install", I edited /etc/lilo.conf to give my kernel a friendlier name in the boot list, and eventually made it the default when I was satisfied it was good. After any changes to lilo.conf, you have to run lilo (which just reads the conf file and rebuilds the boot info).
Warning: The "vga=788" boot parameter which enables the graphical boot screen seemed to later confuse the login display manager (xdm?). This probably would have happened with the earlier kernel too if it hadn't had a bug that prevented the graphical boot from working properly (which then ironically allowed the login display manager to work fine). The solution is to simply disable the graphic boot. Here is the lilo.conf entry I am using for my kernel:
image=/boot/vmlinuz-2.4.21-0.25mdk-sxf1
        label="crusoe-acpi"
        root=/dev/hda1
        read-only
        optional
        append=" devfs=mount"
        initrd=/boot/initrd-2.4.21-0.25mdk-sxf1.img
Besides removing the "vga" parameter, I have also un-disabled acpi (which is turned off in the default lilo.conf entry installed by the kernel Makefile). This enables the battery status applets to work, and allows me to attempt to suspend the machine, but bad things happen when I do that (it actually pops up the BIOS suspend-to-disk window and seems to suspend, and later restores, just fine, but the OS does not leap forth happily and continue running after that--rather it sits there limply like that fish you froze and thawed as a child to see if it would survive). My best understanding (which is poor since I know nothing about this stuff) is that the BIOS in this machine supports ACPI instead of the older APM, whereas Linux at this point only barely supports ACPI (but will more thoroughly in 2.6). If anybody knows otherwise, please let me know.
If you want to play with that, first you need to format that suspend partition:
Action: I got lphdisk from http://www.procyon.com/~pda/lphdisk/ and simply ran it with no parameters. It found the suspend partition I created, and formatted it for me (as I bit my nails hoping it wouldn't eat the rest of my disk).
The BIOS seemed to like it as the suspend and restore proceeded without complaint, right up to the dead-fish part. By the way, I did the suspend by "echo 4 > /proc/acpi/sleep". If that was stupid, please tell me.
- Remapping the Keyboard (optional)
-
There are a number of things I don't like about the default keyboard layout so I decided to change it. Probably the correct thing to do would be to just make a new keyboard layout for xkb, but this seemed like a lot of details to learn for a one-shot deal so I opted for a couple of hacks instead.
The biggest issue for me is I wanted the right shift key to be "/?" instead. Using "showkey" from a console screen (not in X) you can find keycodes for any key on the keyboard, and then "loadkeys" lets you remap them.
Action: I added the following lines to the end of /etc/rc.d/rc.local :
# Added 9/2003 by sxf to map the right shift key to /?
echo "Mapping right Shift to /?"
loadkeys << EOF
keycode 54 = slash question
EOF
Those turn the right shift key into /? in console mode, though I believe they leave it also enabled as a shift key so if you don't let up the key fast enough the next thing you type will come out in caps.
Warning: The keycodes given by showkey are not quite the same as the ones X uses. You must use "xev" (see below) for X.
Despite claims that X reads its keymap from the kernel keymap, the above change doesn't propigate into X. The corresponding programs for X are "xev" to show the keycodes (you may have to install this, in the "contrib" package, if you didn't install it originally), and "xmodmap" to remap them. In theory, you can just put your xmodmap commands in ~/.Xmodmap, but it turns out this doesn't work any more because xkb (a newer approach) is in use and the system scripts claim the two don't play well together and so they ignore any .Xmodmap file you may have. In truth, it seems to work fine (if you just run "xmodmap ~/.Xmodmap" by hand) but whatever. So instead you can make a script that runs xmodmap, either on a single file of xmodmap commands as just mentioned, or more crudely just a bunch of calls to xmodmap.
Action: Create a script in your home directory called .xstartup with the xmodmap commands you want. This can be any executable script (bash, tcsh, perl, binary, whatever...). If you grab mine (follow the link), be sure to set the exec bit ("chmod u+x .xstartup"). Mine will:
- Swap the right shift and /? keys.
- Turn the CapsLock key into a Control key.
- Turn the Win key (key between left ctrl and alt) back into a Win key, which is only necessary under KDE because I couldn't get KDE to stop disabling it, much as I tried. I care about this because I use the Win key as a modifier for keyboard shortcuts to do things like close/move/resize/migrate windows. If you use emacs, you may want to do something different with it...
- Disable the Num Lock key (right of F12) as I found it more annoying than useful.
The script can actually be named anything you want and be anywhere you want, but best not to confuse it with other x startup scripts (e.g., .xsession) which may or may not be getting executed by other means in the future. Mine is actually kept elsewhere but I added a link from ~/.xstartup to it. You can add other session startup commands there as you wish, since it is (going to be in a moment) a generic script that gets run any time you start a new X session.
Gnome-only Option: In Gnome, you can just add your .xstartup script to the session startup programs under (menu)Configuration/Gnome/Advanced/Sessions/Startup Programs. Don't try to pass complex parameters here--the parsing is minimal (quotes don't work, etc..)
Note that if you take this approach, you probably want to delete the "sleep" in my script and the Win-key related maps, both of which are KDE specific.
Unfortunately, KDE presents no obvious way to add user startup scripts. I wouldn't care about KDE except Gnome trashed its gconf database on me for no obvious reason and lost me all of my desktop and panel settings (leaving me with one empty panel and no applications or menus) and this pissed me off enough to switch to KDE which has been much more stable all the way around. On the other hand, while KDE seems to provide a way to do this kind of key-remapping (see Configuration/KDE/Accessibility/Keyboard Layout), in particular giving options with respect to treatment of the Win key, CapsLock, and such, it doesn't seem to persist properly when you log out and back in (at least the Win key doesn't) and instead just makes it more difficult to do it ourselves (hence the "sleep" in my script -- to make sure my key map commands happen after KDE has made its mess).
Now in theory, we could just put our commands in ~/.xsession, or ~/.xinitrc, but alas, those too are ignored because KDE and Gnome claim to manage your session startup process and so those old ~/. files are only consulted as a backup if you're not running a newer desktop manager. So, I resorted to hacking the system scripts (which I hate doing because I'll have to do it again when I upgrade the OS). But it's a simple change:
Action: Add the following four lines to /etc/X11/Xsession, immediately after the loop over items in init.d:
# run user's session startup script if any:
if [ -x "$HOME/.xstartup" ]; then
        "$HOME/.xstartup" "$DESKTOP" &
fi
Note if you put it any later in the file than where I specified, it won't get run since the script ends as soon as it launches the display manager (KDE/Gnome) in the next block. In fact, if it went any further, it would run your ~/.xsession file, but it never gets there.
[Oh, and while you're poking around in system scripts, fix a minor bug in /etc/X11/xdm/Xsession: "-login" should be "--login".]
So, that's not a terrible hack to the system files, all things considered, and it creates a consistent startup script across all display managers. The display manager is passed in as a parameter ("$DESKTOP" should be something like "KDE" when running KDE and something else when running Gnome or IceWM or whatever) so if you want to do things differently in some cases (e.g., skip the sleep and Win key stuff when not in KDE) it should be easy to condition it.
- Misc
-
A few other miscellaneous things (notes to myself for next time):
Action: I had to install flash 6 for mozilla from the web since Mandrake doesn't provide it with their distribution.
ispell seems to be gone, or at least the english versions of the dictionary aren't available on the Mandrake distribution. But I noticed an ispell script in the (undocumented) aspell directory, and it seems to work as such. (I use ispell with a vim script that does crude spell checking in vim.)
Also, I did go through and install essentially all of the Mandrake recommended updates (security and bug fixes as well as a few newer versions of things) via the software updater. I've had troubles with it in the (distant) past, but it performed all the updates without a hitch.Action: ln -s /usr/share/aspell/ispell /usr/local/bin/ispell
Action:
Main Menu/ Configuration/ Mandrake Control Center/ Software Management/ Update - Related Links
-
Linux on a Fujitsu Lifebook P-Series P1000 (P1110)
Installing Debian on a Fujitsu P-2110
lphdisk
Chris Bare's P1000 series touch-screen driver [Added Oct 13, 2003]
Fedora Core FC1 on a Fujitsu Lifebook P1120 [Added Jan 8, 2004] Note he seems to have suspend sorta working. - Wishlist
-
I hope someone gets the touch screen working.
And it would be nice if the mouse could be made to emulate a scroll wheel when a magic key was pressed or something, but I haven't figured this one out yet. Even if keystrokes like ctl-up_arrow could send scroll wheel increments, this would be really handy for apps like the Gimp which let you zoom in and out with the scroll wheel while using other tools. But I don't know of any way to generate mouse events from keypresses (seems to me I managed this once when using linux on a one-button Mac laptop, but I don't recall how just now...)
If anyone figures these things out, has an easier way of doing anything I did here, or has anything else to add or ask, please do email me.
Hope this helps.
- Update, Oct 13, '03 - Touchscreen
-
The touchscreen now works, thanks to the efforts of Chris Bare who wrote a custom driver for the purpose. It took a little head-scratching and a few dirty reboots to get his driver installed properly, but here was the magic formula that worked for me:
Action: Add the following line to /etc/modules.conf (if this is not done, the evdev module will not be loaded when needed and you will probably have to hard-reboot):
alias /dev/input/event* evdev
Action: Copy usbtouch_drv.o from Chris's package to:
/usr/X11R6/lib/modules/input/usbtouch_drv.o
Action: Add the following lines to /etc/X11/XF86Config-4 (and remove or comment out any old attempts to get the touch screen working!):
Section "InputDevice"
        Identifier "Touch Screen"
        Driver "usbtouch"
        Option "Device"        "/dev/input/event0"
        Option "DeviceName"    "touchscreen"
        Option "ReportingMode" "scaled"
        Option "SendCoreEvents"
        Option "MinX"   "900"
        Option "MinY"  "1090"
        Option "MaxX" "16090"
        Option "MaxY" "16000"
EndSection
And make sure the ServerLayout section has the touch screen enabled:
Section "ServerLayout"
    Identifier  "layout1"
    InputDevice "Keyboard1" "CoreKeyboard"
    InputDevice "Clittormouse" "CorePointer"
    InputDevice "Touch Screen" "SendCoreEvents"
    Screen      "screen1"
EndSection
And that's it. I used his usbtouch_drv.o file as provided (I did not recompile it myself) and it worked fine against my custom-compiled kernel. It is critical that the evdev module gets loaded, or the display manager will just hang in a bad way. I just made a semi-educated guess with that modules.conf line, but it seems to work so I'm not complaining. The calibration numbers provided above (MinX, etc..) are from Chris Bare but they work just fine on my machine.
- Update, March 19, '04 - Net Boot Based Install
-
This guy didn't get the floppy drive, but was in fact able to net boot it:
1) Although the p1120 BIOS setup screens seem to imply that the machine can be booted from a USB cd-rom, I've had no luck doing so.
2) However, the machine does support PXE (Preboot Execution Environment) and linux can actually be installed completely over the network, using DHCP (server) and TFTP (server). Since I had a USB-CDROM, after I booted the kernel over the network I was able to install the rest via the cdrom. (I had declined purchasing the floppy.)
- Update, April 21, '04 - Booting RUNT from USB pen
-
Emil says:
I've been able to use the ODH Dual Bootable 128M USB pen from http://www.netac.com to run RUNT.
The main advantage of this pen is that it has a FD/HD switch and in the FD mode it emulates perfectly a USB floppy while making available only 1.4M of the flash memory. In the HD mode the rest of the flash (128 - 1.4) is available.
The trick is to toggle the FD/HD switch once the kernel has booted and voila you have the full RUNT system on a single USB pen.
So right now I have a bootable Linux system (including the wireless orinoco drivers and a full bunch of utilities) on a flash pen.
- Update, July 3, 2004 - External Keyboard, Mouse, and LCD
-
I bought a Belkin USB ergo keyboard, a logitech USB track ball, and re-purposed my 17" LCD to turn my P1120 into a tiny, fanless desktop machine. I expected it to be a challenge getting the external keyboard working, but in fact I hot-plugged it in and after Linux scratched its head for a couple of seconds over what this new USB device was, it just worked. In fact both keyboards still work, and if I hold down the shift key on one, I can type caps with the other.
The mouse required only slightly more tweaking: since I had the clittormouse and touch screen each individually listed in the X config file, I had to add a third definition for the new external track ball. This change required restarting X, but it worked first time with no problems -- so now I have three mice working at the same time (touch screen, clittormouse, and track ball). Incidentally, the Belkin keyboard has 2 USB ports on it, so I was able to chain the mouse off the keyboard and leave a port free on the computer itself. Also, in theory I should be able to plug my camera into my keyboard for downloading pics, so I can pretty much just hide the P1120 behind my 17" display and just forget about it. Really, it's a pretty slick desktop setup.
This is the new definition in my XF86Config-4 file:
Section "InputDevice"
    Identifier "Trackball"
    Driver "mouse"
    Option "Protocol" "IMPS/2"
    Option "Device" "/dev/input/mouse1"
    #Option "Device" "/dev/usbmouse"
EndSection
And also this line is added to the ServerLayout section:
InputDevice "Trackball" "SendCoreEvents"
I also changed my display resolution to 1280x1024 (which the P1120 can only pull off in 16-bit color mode, but that's good enough for most uses):
# Modes "1024x600"
Modes "1280x1024"
- Update, Nov 29, 2005 - installing Ubuntu Breezy 5.10
-
I picked Ubuntu over Mandrake this time for a couple of reasons: I've had too many problems (corrupt database, etc.) with Mandrake's rpm manager and I've heard Debian/Ubuntu's apt-get system is a bit more seasoned and less quirky. Also, Mandrake seems to have adopted the approach that if they make it sufficiently troublesome to access their free products, people will gladly pay. I am gladly switching to Ubuntu.
This went *mostly* without issue. It feels a bit slower now, probably due to Gnome, but on the other hand video playback with Xine, Totem, Mplayer, and such is now realtime on my external 17" 1280x1024 monitor whereas for whatever reasons this was jumpy before.
Here are the most noteworthy issues I did have:
- Network install
-
I tried to install with a USB CD-R but the machine made no obvious attempt to boot this way despite BIOS setting which implied it would. [UPDATE Apr 18, 2006: See update below, this date, for possible workaround.] So I gave in fairly quickly and kicked up a dhcpd and tftpd on my other Linux machine, both configured to do nothing but serve the fuji a netboot image from the Ubuntu CD. I forget the details but it was pretty staightforward with minimal Googling (and looking at the dhcpd and tftpd man pages), and within half an hour I was net-booting the fuji into the network installer. Don't forget you have to enable PXE (net booting) in the fuji BIOS. (I hit F-12 at boot time to manually select net-booting for the install rather than changing the order, so I didn't have to worry about it re-net-booting after the install was complete.)
The install went mostly straightforwardly, except it hung in the middle of me manually editing the sources.list file, half way through the install, during the "Configure apt-get" phase. I rebooted (PXE) into the installer, chose "expert mode" and skipped around a bit to get back to where I was, which I won't say exactly worked without a hitch. Try to avoid this. If you do have to do it, note you have to walk through most of the phases in order anyway to configure the network and such properly.
Other than that hiccup, the install went smoothly.
The reason I was hand-editting it is because I wanted to point apt-get at the CD-R on my networked machine so I could do a LAN install rather than waiting on the internet. I did eventually make this work. This should be more automatic, though. The Ubuntu *network* install could definitely use some simple improvements.
- CPU NOT a 686
-
The installer decided I had a 686 CPU (I suppose it's possible I made this selection mistakenly myself at some point but I don't recall doing so). Not knowing any better, I didn't realize this was a mistake. As a result, my machine, post-install, was crashing about once a day, since the Crusoe doesn't in fact support SSE instructions. Once I figured this out (with other people's help), I installed the latest 386 kernel using the GUI package manager, and it's been rock solid ever since. There is apparently a CMS (code-morphing) bug in the Crusoe which turns out to be responsible for some X problems I had under Mandrake, but I haven't seen them yet under the current Xorg, possibly because of a different version of gcc that was used to compile it. Bottom line: so far so good.
- Root Password / bugs in User and Groups manager
-
By default, you cannot "su" to root in Ubuntu -- you can only "sudo" things. I wasn't sure what they had done to make this so at first, so I didn't bother to fix it right away. Boy was that a mistake! The User and Groups manager (GUI version) has some nasty bugs where it randomly deletes group partitipation in users other than the ones you are editing. In my case, I openned the app, deleted the guest account I had made earlier, and closed the app, and then discovered it had just removed admin priviliges from the account I was logged in as (not guest), leaving me with NO ADMIN PRIVS for the machine. I had to reboot in single user ("Recover") mode to fix this. It turns out all one has to do is assign a password to root and you can "su" as normal.
- External Display to 16 bit
-
I didn't even think the fuji had enough video memory to run an external display at 1280x1024x24 bits, but it turns out it does (yes, some simple math verifies this--I had just never done the simple math). Problem is, it does it really, really poorly (weird stripey noise around the mouse, etc.). Once I realized what was going on, I set the default depth to 16 in the xorg.conf file (the only change I've had to make to it, incidentally), and now things work splendedly. I'm just using the stock ATI driver, not fgrlx (which I haven't tried). I may try it some day because scrolling in vi seems slower than it ought to be and I'm curious if that will fix it, but for now I'm done futzing and want to get back to work. If anybody compares the ati and fgrlx drivers on this machine, please let me know the results!
- Touch-screen, and Wireless
-
Since I've been using it as a silent, unubtrusive desktop machine, I haven't had need for the touch screen or wireless, so haven't tried to make them work. If anybody does make either work in Breezy, please let me know. (For all I know the wireless works fine -- I just haven't tried it yet.)
[Update Dec 2, 2005: Wireless works fine by default!]
[Update Apr 13, 2006: Touchscreen works, using a completely different approach. Note that the old drivers that worked under Mandrake are probably not binary-compatable with the Xorg server, and definately not compatable with the 2.6 kernel's treatment of the touch screen, so don't bother trying to use that.]
So, that's about it. It was a fairly painless install overall, and the resulting system works quite well, and apt-get (and the GUI package manager) is super handy for pulling in anything and everything under the sun, easily. It looks like upgrading to new releases is very straightforward, so hopefully I will be able to stay up-to-date for years to come without having to fuss with another install.
[UPDATE Apr 18, 2006: See here for notes on installing Ubuntu from a USB optical drive using Windows.]